As a beginner designer, I was really confused about selling patterns on Ravelry. There were not many youtube tutorials and many of them seemed to skip over the information I needed (or wanted) to know. So today I am going to try my best to show you how to publish FREE patterns on Ravelry. I capitalized the word free because as of the day I have no patterns that cost money because I have not set-up a PayPal account to be able to link to Ravelry to have my patterns cost money.

1. Uploading a pattern to Ravelry
Go to Ravelry.com and log-in or make an account if you are new.
Look at the top right corner and you will see forums, notebook, messages and your profile picture.
Click on "my notebook"

Then click on contributions

You will then see two sentences. One sentence says "Add a pattern to Ravelry" and the other will say "Add yarn to Ravelry". Click "do it" on Add a pattern to Ravelry.

Once in you will be asked to search your pattern name to see if there are any other duplicate names in the system. If there are patterns with the name you chose, try switching the name up a bit so that it is easily searchable and has a chance against hundreds of other pattern names. Click "add this pattern to Ravelry" once you've figured out the name.

Now it's time for the fun part. You'll be taken to the main page where there are 10 sections that you have to fill out name, gauge, yarn, photos, etc, all of the necessary things to make sure your pattern is searchable in the Ravelry database.
The first thing is the Name and Designer. In this section, you'll be inputting the name of your pattern. Choosing if you want the pattern to show your Designer name (mine is Dezzyloops). You can choose to record what the name of your pattern is just in case you think some people might not know how to pronounce it.
Click next step.

Craft and Category- For this section, you will be choosing what type of craft your pattern is, the terminology the pattern is written in US or UK, here is a link to the difference between US and UK terms. After that, you have the category section where you'll choose what type of pattern you have. For example, I chose Accessories→Jewelry→Earrings.
Click next step.

Sources- In this section, you will be selecting the month and year in which your pattern was first published. In my cause, I published a pair of crochet earrings called Elanor in September 2019. If you do not know then you can select "I'm not sure". After that, you will select where the pattern is published. I published the pattern on Ravelry and also my blog.
Click next step.

Links and Prices- I don't know everything there is to know about this section because all of my patterns are free for now. I don't have a PayPal account set up so I'm not allowed to have the pattern cost anything, So for this section, if you have a blog or the website where you want to link your pattern you can do so. So I linked back to my blog, Although the pattern can not be purchased on my blog it can be viewed which is why I checked off the first box. I checked off free but the price section had other options for currency type and price.

I love the Attribute Tags section because I love trying to figure out what categories best describe my pattern. So for this section, you'll be going through each list of folders and selecting which features best describe your pattern.
Click next step.

Yarn and Needles- is a section where you type in the yarn and needles you used for the pattern. This section is a little tricky for me sometimes because all 2019 I only used yarn in my stash which was 98% thrifted or gifted so none of them came with labels and the ones that did was discontinued.
Click next step.

Gauge and Yardage- is another section I have trouble with sometimes. I've never really cared for gauge until I started wanting to get more in-depth with knitting and crocheting. I wanted to know my facts and be one of those smart knitters that could break down gauge and yard conversions without blinking. But honestly, I am not really equipped at the moment to really break down this section for you.
Click next step.
 Language- is a section I can't wait to be able to check off more than one box for. I love learning about different languages and cultures. Some of the most beautiful patterns I've seen on Ravelry are in French, Spanish, Japanese, German, etc. I am currently "trying" to learn Spanish and Korean and I would love to be able to translate my patterns to the languages that I know. For this section select the languages that your pattern will be available in.
Click next step.

Notes- are where you can get creative and write down all the extra interesting facts about your pattern. You can go into more detail here and share sizes, materials needed, the number of skeins and color of yarn, etc. I am still learning the style in which I write my notes but for now, I just write down the Skill Level, materials, stitches used, etc,
Click next step.

Photos- I love how Ravelry gives you multiples options of what platform you want to use to upload a photo. I usually use "Choose Files" and "Google". Try to make sure your photos are nice and clear why people will be able to see your pattern better. Whenever I have a pattern tested I also like to add those in as well.

If there are any errors or warnings Ravelry will tell you here and give you a chance to fix them before publishing the pattern. Fix them and then you can publish your pattern.
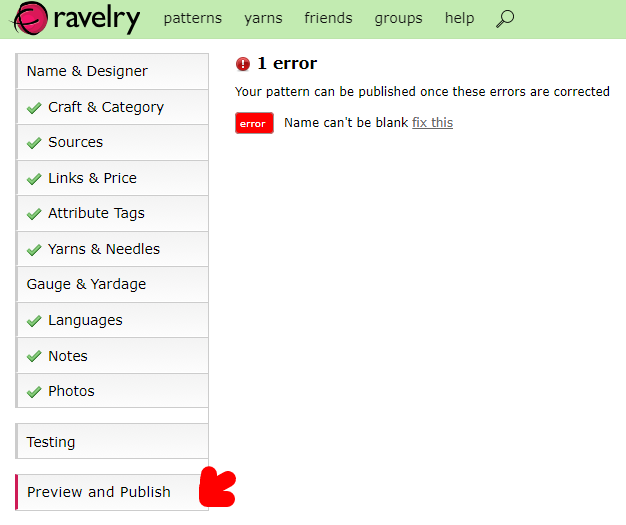
Once you've fixed the errors click publish this pattern to Ravelry.

To be able to add a PDF you need to have a pro account. To do that you need staff help to link your Ravelry ID to the pattern to create a PRO account and upload the PDF file. You will be able to tell if you have a PRO account if you look at the top of the page and see PRO next to My Notebook.
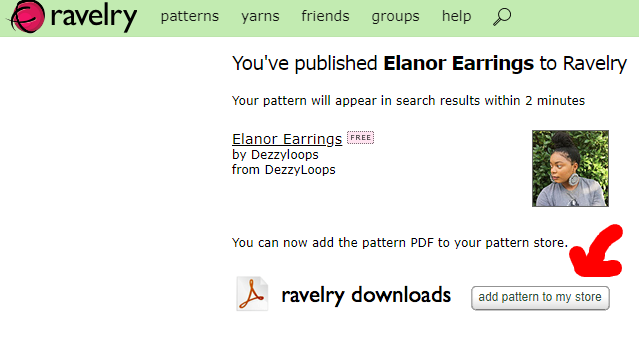

Once you are a pro account you go to your pattern sales and you'll have a few more things to do before you can have a successfully published pattern.

Since the pattern is free choose the free option. I then went to PDF files and clicked "Choose File" I then uploaded the PDF for the pattern and clicked "upload". I think clicked save changes.


I forgot once you check off the "Free?" box make sure to click "save changes" so that the pattern becomes active.

I pray I helped you out with this post. I am still learning about being a designer and the more I learn the more I want to share and document for those coming behind me. If you have any questions please comment below or dm me on any of my social media platforms
1. Uploading a pattern to Ravelry
Go to Ravelry.com and log-in or make an account if you are new.
Look at the top right corner and you will see forums, notebook, messages and your profile picture.
Click on "my notebook"
Then click on contributions
You will then see two sentences. One sentence says "Add a pattern to Ravelry" and the other will say "Add yarn to Ravelry". Click "do it" on Add a pattern to Ravelry.
Once in you will be asked to search your pattern name to see if there are any other duplicate names in the system. If there are patterns with the name you chose, try switching the name up a bit so that it is easily searchable and has a chance against hundreds of other pattern names. Click "add this pattern to Ravelry" once you've figured out the name.
Now it's time for the fun part. You'll be taken to the main page where there are 10 sections that you have to fill out name, gauge, yarn, photos, etc, all of the necessary things to make sure your pattern is searchable in the Ravelry database.
The first thing is the Name and Designer. In this section, you'll be inputting the name of your pattern. Choosing if you want the pattern to show your Designer name (mine is Dezzyloops). You can choose to record what the name of your pattern is just in case you think some people might not know how to pronounce it.
Click next step.
Craft and Category- For this section, you will be choosing what type of craft your pattern is, the terminology the pattern is written in US or UK, here is a link to the difference between US and UK terms. After that, you have the category section where you'll choose what type of pattern you have. For example, I chose Accessories→Jewelry→Earrings.
Click next step.
Sources- In this section, you will be selecting the month and year in which your pattern was first published. In my cause, I published a pair of crochet earrings called Elanor in September 2019. If you do not know then you can select "I'm not sure". After that, you will select where the pattern is published. I published the pattern on Ravelry and also my blog.
Click next step.
Links and Prices- I don't know everything there is to know about this section because all of my patterns are free for now. I don't have a PayPal account set up so I'm not allowed to have the pattern cost anything, So for this section, if you have a blog or the website where you want to link your pattern you can do so. So I linked back to my blog, Although the pattern can not be purchased on my blog it can be viewed which is why I checked off the first box. I checked off free but the price section had other options for currency type and price.
I love the Attribute Tags section because I love trying to figure out what categories best describe my pattern. So for this section, you'll be going through each list of folders and selecting which features best describe your pattern.
Click next step.
Yarn and Needles- is a section where you type in the yarn and needles you used for the pattern. This section is a little tricky for me sometimes because all 2019 I only used yarn in my stash which was 98% thrifted or gifted so none of them came with labels and the ones that did was discontinued.
Click next step.
Gauge and Yardage- is another section I have trouble with sometimes. I've never really cared for gauge until I started wanting to get more in-depth with knitting and crocheting. I wanted to know my facts and be one of those smart knitters that could break down gauge and yard conversions without blinking. But honestly, I am not really equipped at the moment to really break down this section for you.
Click next step.
Click next step.
Notes- are where you can get creative and write down all the extra interesting facts about your pattern. You can go into more detail here and share sizes, materials needed, the number of skeins and color of yarn, etc. I am still learning the style in which I write my notes but for now, I just write down the Skill Level, materials, stitches used, etc,
Click next step.
Photos- I love how Ravelry gives you multiples options of what platform you want to use to upload a photo. I usually use "Choose Files" and "Google". Try to make sure your photos are nice and clear why people will be able to see your pattern better. Whenever I have a pattern tested I also like to add those in as well.
Testing- When I first saw this section I was so confused about what I had to do. If you want to learn more about how I learned to get a pattern tested on Ravelry click here. For this section, if you are not having a pattern testing just skip but if you are then you need to post the tester code in the pattern name display and give the code to your testers that way they can link their projects and be registered as a tester for your project.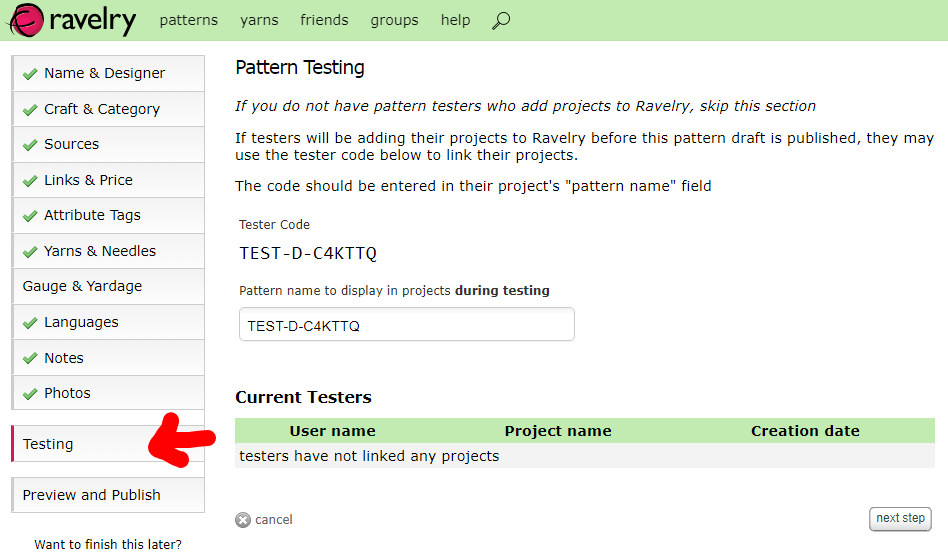
If there are any errors or warnings Ravelry will tell you here and give you a chance to fix them before publishing the pattern. Fix them and then you can publish your pattern.
Once you've fixed the errors click publish this pattern to Ravelry.
To be able to add a PDF you need to have a pro account. To do that you need staff help to link your Ravelry ID to the pattern to create a PRO account and upload the PDF file. You will be able to tell if you have a PRO account if you look at the top of the page and see PRO next to My Notebook.
Once you are a pro account you go to your pattern sales and you'll have a few more things to do before you can have a successfully published pattern.
Since the pattern is free choose the free option. I then went to PDF files and clicked "Choose File" I then uploaded the PDF for the pattern and clicked "upload". I think clicked save changes.
I forgot once you check off the "Free?" box make sure to click "save changes" so that the pattern becomes active.
I pray I helped you out with this post. I am still learning about being a designer and the more I learn the more I want to share and document for those coming behind me. If you have any questions please comment below or dm me on any of my social media platforms
Comments
Post a Comment